Use of Portable, Precision Alignment – A Case Study by Dr. Purcell, MD

Richard Purcell, MD
Adult Reconstruction Surgeon, El Paso, TX
Texas Tech Department of Orthopaedics, El Paso, TX
University Medical Center El Paso and Las Palmas Medical Center (HCA)
Presentation
The 74-year-old patient with left TKA implanted two years ago (Figure 1) complained of persistent anterior knee pain, limited range of motion, and dissatisfaction. Given the patient’s severe dissatisfaction with his knee replacement, a revision knee arthroplasty was indicated for component malrotation and arthrofibrosis.
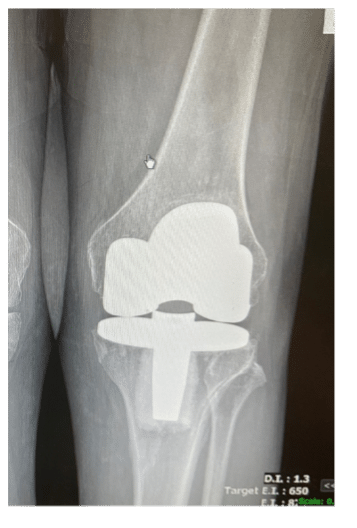
The patient tested negative for infection with a well healed midline incision, his active range of motion was 10 degrees to 85 degrees, and he was stable to varus and valgus stress throughout his range of motion. On radio graphs, he had a cemented posterior stabilized implant with no peri-implant lucency, migration, or subsidence which appeared to be slightly flexed. On the sunrise view he had a patella showing an increased lateral tilt. A pre-operative CT scan was obtained to evaluate for component position and rotation given the limited knee flexion and concern or malrotation. The tibial component was measured to be 10 degrees internally rotated with respect to the tibial tubercle.
Pre-Op Plan
Lantern® with Balance is designed to accurately determine medial/lateral gap tension in both extension and flexion after removal of previous hardware which may be used as a reference prior to any additional reaming and/or bony cuts that may be required. The goal for this patient is to restore equal extension and flexion gaps after fitting with proper augment, component, and polyethylene thickness.
Operative Findings and Approach
Tibial and femoral canals were reamed for planned cementless stem fixation and the
tibia was prepared with a fresh tibial cut perpendicular to the mechanical axis. Using an intramedullary cut guide, the distal femur was re-cut at 6 degrees of anatomic valgus, which required the use of a 5mm medial augment and a 10mm lateral augment.
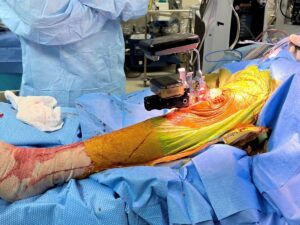
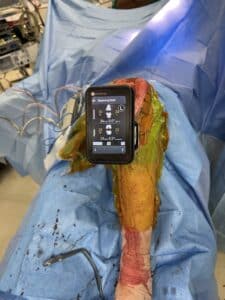
With fresh distal femoral and tibial cuts, the extension gap was established, the knee was brought into full extension, and the OrthAlign Lantern gap tensioner was inserted (Figure 2). The tensioner was distracted with a torque-limited driver, and the extension gap measurements were determined to be a 22mm medial and 24 mm lateral extension gap. Additional medial release was performed, and the gap tensioning device was re-inserted and demonstrated symmetrical medial and lateral extension gaps of 24mm.
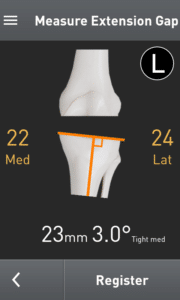
With a balanced extension gap established, the knee was brought into 90 degrees of flexion to measure and set the flexion gap. After inserting the Balance tensioner and using the same torque limiting handle used in the extension gap, the flexion gap is distracted, and the ligaments are tensioned. Once the device has been distracted, the 4-in-1 cut guide is manually rotated while visualizing the live changes in the medial and lateral flexion gaps on the Lantern screen. The guide is rotated until the desired medial and flexion gap numbers have been achieved (Figure 3).

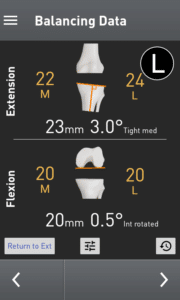
For this case, a symmetric flexion gap of 20mm was measured. Once the surgeon is satisfied with the anterior-posterior position of the cut guide as well as the chosen size, and augments have appropriately been planned for, the femur can be cut and all instrumentation may be removed. Now, final flexion gap height can be measured with the Lantern gap tensioner with paddles resting on tibial and posterior condylar bone. Using the Lantern summary screen, both extension and flexion gaps are displayed with a 1mm overall tighter resultant flexion gap (Figure 4).
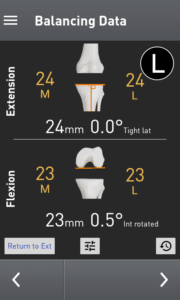
Note: If using systems with a posterior capture on the 4-in-1 cutting block, the surgeon must know the thickness of the capture and add that thickness to the measured flexion gap displayed on the Lantern. Failure to do this will result in a flexion gap that is as many millimeters loose as the posterior capture is thick. For example, this flexion gap measured 20mm but by accounting for the 3mm thick posterior capture will result in a 23mm flexion gap (figure 4).
Follow Up
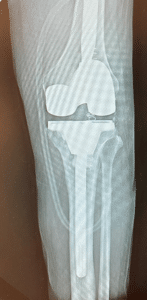
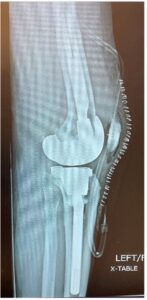
At the 6-week postoperative clinical exam, the x-rays showed good positioning of implants (Figures 5 and 6). The patient was doing well showing great signs of pain relief with increased stability and function.
Clinical Benefits From Dr. Richard Purcell’s Perspective
For this case, the use of OrthAlign technology was imperative. Revision TKA balancing takes on a slightly different frame of thought compared to primary total knee balancing where our goal is to equalize flexion and extension gap heights to avoid flexion/extension gap mismatch.
In the revision setting, our available gap heights have already been partially determined by the previous arthroplasty, implant removal, and bone loss. It is our job to evaluate and precisely determine what these gap heights are using Lantern balance, and then to use the implant system we choose to fill those gaps with implants, offsets, and augments.
With the only FDA approved system for computer navigation in revision total knee arthroplasty, Lantern Balance finally gives surgeons an objective assessment of gap balancing in the revision setting. Surgeons now have the capability to use the power of technology to aid our ability and to accurately fill those gaps to achieve a well-balanced revision total knee.
Try Lantern’s gap balancing application in your next revision knee arthroplasty to truly feel the difference.